Post Vault

Showing posts with label studio. Show all posts

2.13.2021

Get Mega


This past New Year I had the pleasure of building a special custom shelving unit I've been planning for months, with the idea for it cooking in my head for over a year. It's a very special shelf tailored to my needs for storage designed to hold all of my archival flat-work, comic pages, illustrations, etc. as well as storage for the multitude of sketchbooks I've piled up over the years, all while making them accessible as needed. Enter project code-named Mega Desk.


While I've built functional pieces of furniture to work in the studio, this became my most ambitious project yet. It starts with an idea which takes shape as a sketch, but it doesn't get real until you pull out the tape measure and start recording dimensions in space. With the base idea cooking in my head for over a year I already knew it what I needed this piece to do. Then you tack on additional 'What I'd Like It To Do' functions, such as the pull-out shelf idea. Ambitious indeed.

After a basic sketch depicting the final dimensions it needs to be, and settling on the wood thickness (¾" plywood is pretty sturdy) it's time to break it down and have every inch accounted for. I turned to the software Corel Draw to work out the plans, and I did it to full scale. That's right, in the sketch where it says the piece is 48" wide I drew a 48" wide shape in the document. It sounds like it would make the document excessive, but thanks to the miracle of vector art the final PDF plans were less than a megabyte. And seriously, drawing it to scale meant every inch was accounted for and calculated into the plans, including the minuscule space for the drawer slides. It had to be if this thing was gonna fit together as it does.
 

While the plans looked normal when printed when you zoomed into the PDF file you can see all the numbers for the dimensions and woodcuts. In fact, during the cutting process I double checked the PDF a few times just to be sure.


Accurate measurements meant I could place the holes for cables and ventilation exactly where they need to be. 
After the design was settled on, the next part was to layout out every single cut to know exactly how much wood would be needed. Understanding that plywood comes in 4' x 8' sheets I simply Tetris'd every wood shape needed filling up 3 plywood sheets worth of wood with a handy amount to spare. Next, it was time to pick out the wood.

 
During lunch on a Friday I headed over to Houston Hardwoods on 34th in Houston where they have all sorts of plywood in all types of prices and finishes. After browsing around for a few minutes I found the thickness and finish I wanted, a nice Birch. While three 4' x 8' sheets wouldn't fit in the 4Runner intact the place was happy to cut them down into smaller halves to get them home. And because I had the cut plans with me we were able to halve them in places where it wouldn't interfere with the planned cuts.


The next day it was time to cut these 6 sheets down. A few months back, anticipating this project as well as other projects I want to do around the house, I ordered a circular saw. Upon reading the subpar  reviews for the stock blade it came with I ordered an aftermarket blade which made it a game changer before I even knew the game. Let's just say the cutting was like a hot knife running thru butter and when I was finished no sanding on the edges was needed. It was that smooth.
 
 
Seriously, I had no chipped or splintered edges. Everything got chopped pristine. As I chopped each piece I kept a some masking tape and a magic marker handy to label each piece which made assemblage a whole lot easier.


After the cuts came the drilling of the vent/cable holes.


Assemblage of the pull-out drawer.

Followed by the general assemblage. That Sunday night I was able to put the wheels on it so we could get it inside.

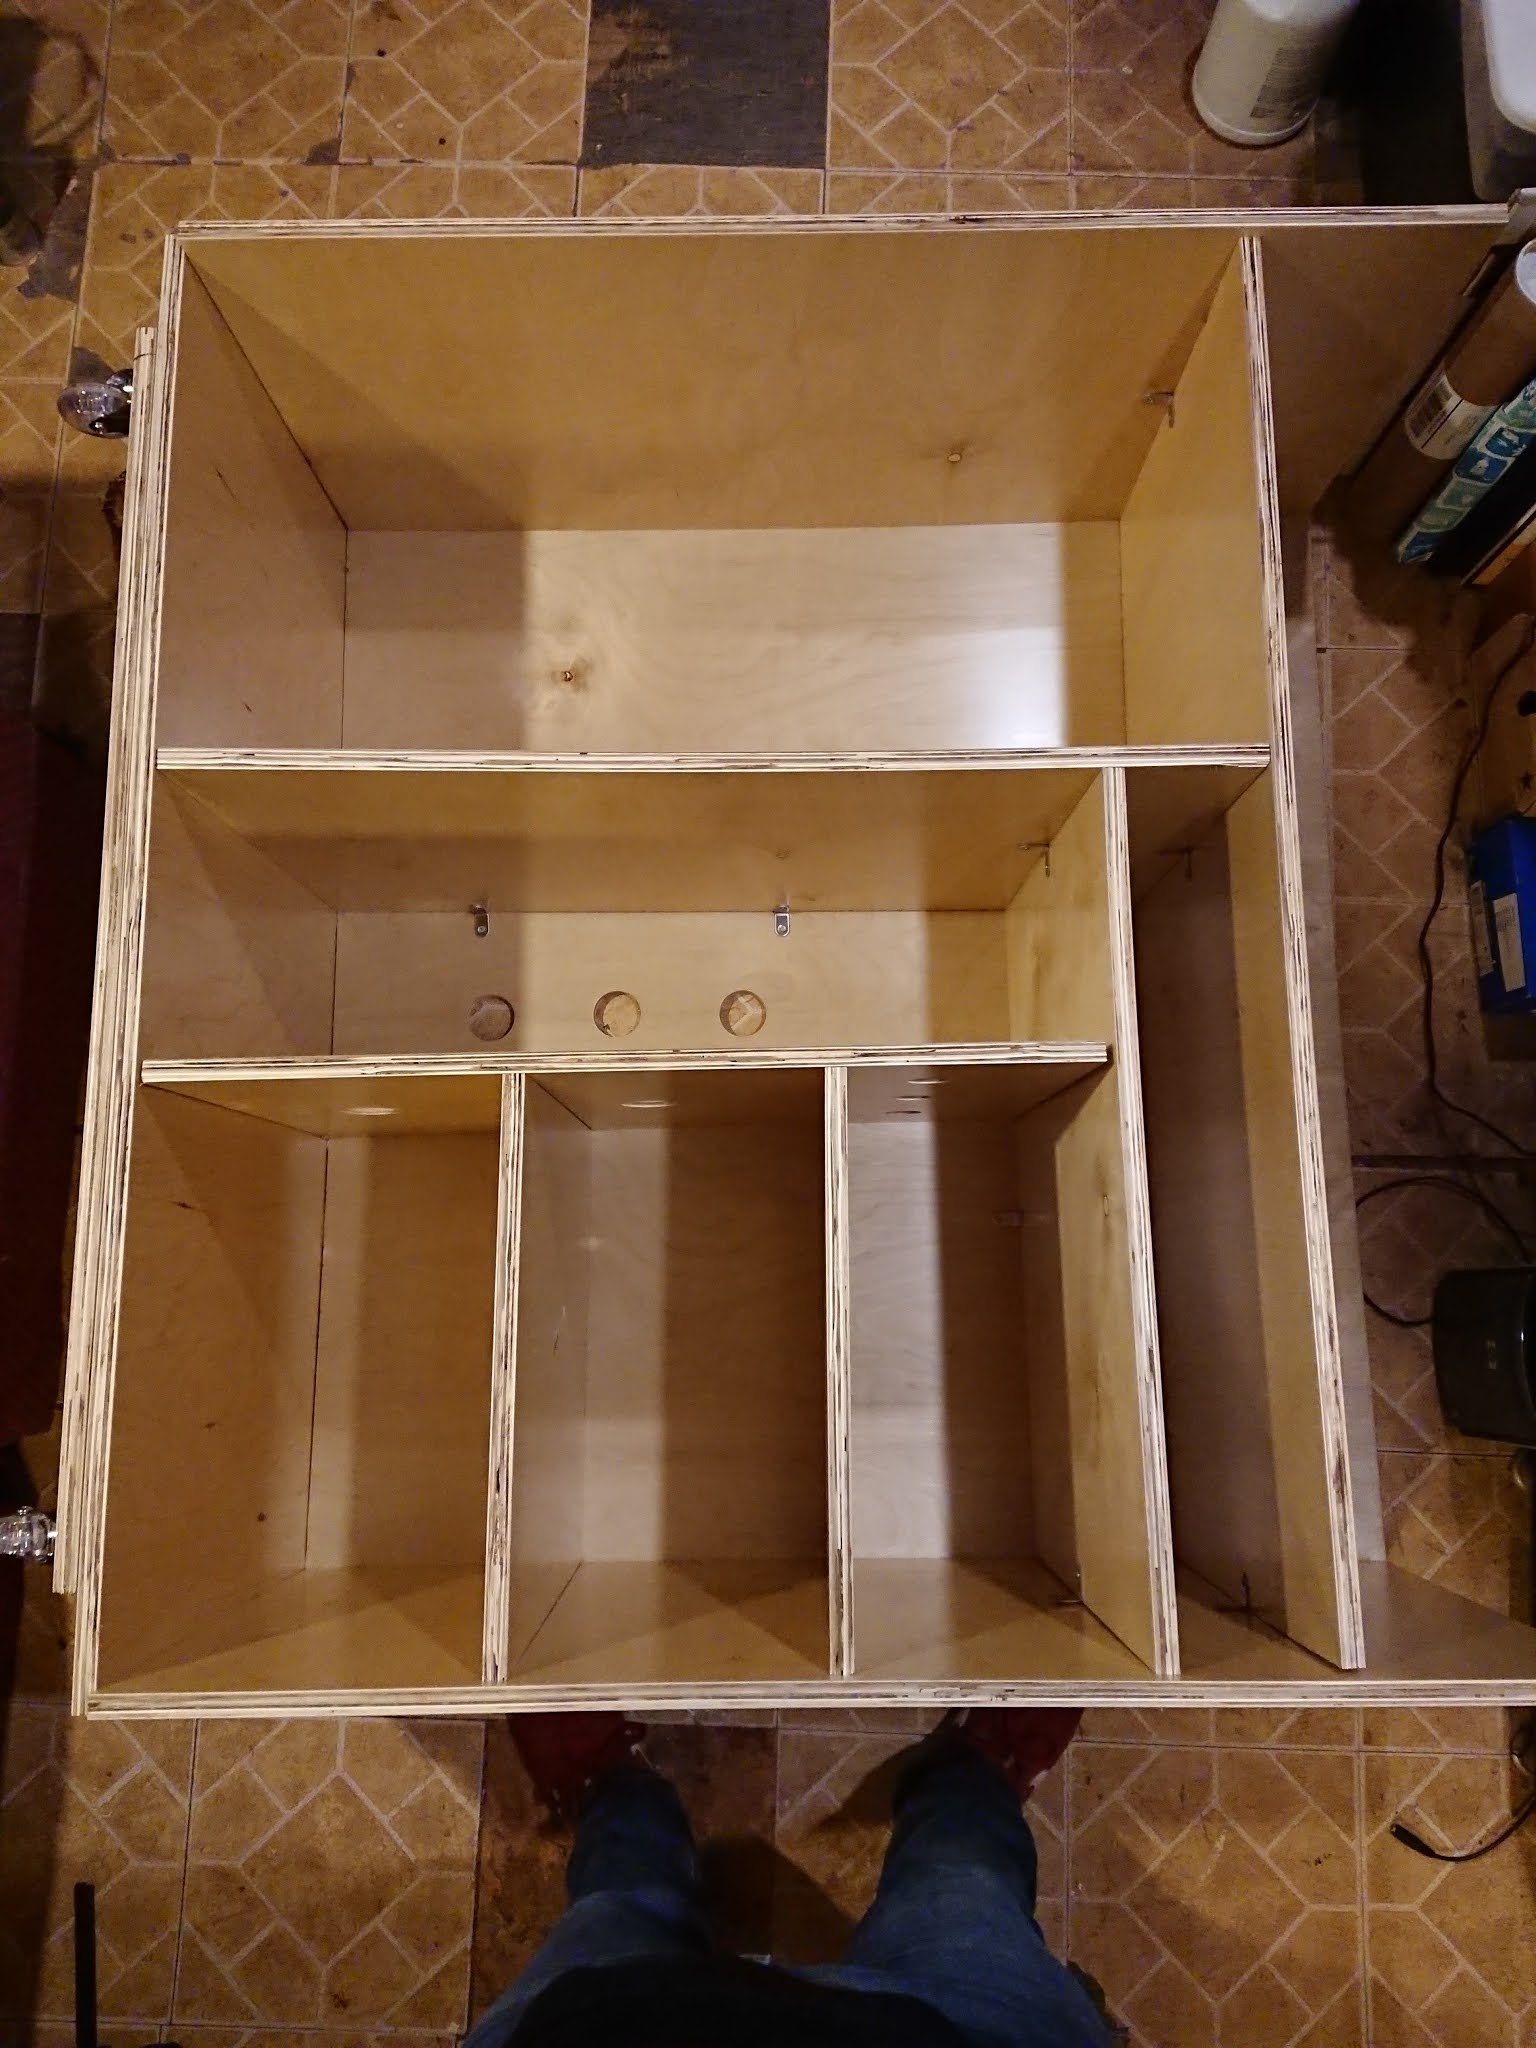
Measuring the shelves on the right side. These weren't a strict size like the left side so I did multiple measurements and drilling so the shelves can be adjusted as needed with removable pegs.

The left side shelves, however, have a very specific purpose, holding flat comic pages, and are sized accordingly. Each shelve had to have certain dimensions inside and are permanently bolted it.

Next came the installation of the pull-out shelf, which actually turned out to be the easiest thing to do in the whole project. A spare piece of wood was used to set each slide at a uniform height on each side, then drilled. That same piece was then laid flat on the center surface as I sat the drawer in on top, giving the drawer the proper clearance underneath. After that I just lined up the slides to the drawer drilling each one as I gradually slid the drawer out. Viola!


Finally came the crowning top. At first I wasn't sure if I wanted to go with tempered glass or clear plexiglass. After shopping around online I decided to go with the plexi on account of it'll be easier to install and the chances are much lower that it will shatter on me, for any reason. And to lessen any possibility of warping or sagging I matched the thickness of the plastic with the thickness of  the wood. 

After a 10 minute search I found a local plastic manufacturer that could produce the dimensions I requested and that also turned out to be the most affordable quote. The turnaround was 5 days.


A bracket in each corner followed by a quick drill pass in each of those corners created a way to fasten this thing down via bolts, screws and washers. Inspired by many clear and frosted-topped desks and how they focused light coming up from the bottom I purchased an LED strip kit to wire up along the edge underneath to create an ambiance and give it a modern feel. The strip can produce all sorts of colors and is wired up via USB, which powers up with one of the towers down there. I also like how if I ever need a light-box all I have to do is place a tiny light face up and trace away.

Ultimately, the pull-out shelf is to house a turntable and large format scanner. I already had a turntable stashed away in the stacks of junk this shelf helped replace. After ordering a new stylus and a pre-amp I'm able to play my favorite records right here in the studio, as well as record those records either for archiving or sampling purposes. The scanner, of course, is for scanning flat work to use digitally and for archiving. So not only does this furniture piece provide me with organization of existing work, but it makes it easy for me to keep organized, to stay on top of archiving work and filing it away.

This shelf consolidated so much space that was being taken up by cumbersome, unsightly boxes and various other dollar store bins and shelves it has literally changed the energy of the studio. As I was sorting, organizing and filling this thing up I felt myself become lighter, my mind less cluttered. Indeed, I feel like since I've been able to put stuff away in a permanent place it's become a finality, a closure of sorts for work spanning the last 12 years which is a very big deal, folks. There are few things worse for a creative mind than stifling your workspace with old work that just continues to pile up. You don't feel like you're progressing being constantly reminded of things you drew half a decade ago. You have to get rid of it or find a way to store it out of sight, otherwise you'll feel stuck!

And there you have it, how I created a custom piece of studio furniture and how it changed the work flow in the studio for the better. Now for a quick run down of what this this cost to build:

Plywood - ¾" Birch 4' x 8': $57 a sheet x 3 sheets = $171

Custom Cut Clear Plexiglass ¾" 20" x 48" = $200

LED Light Strip = $10

USB Switch for the LED lights = $6.89

Clear Caster Wheels = $25

Heavy Duty Drawer Slides = $20

Various hardware including wood screws, L brackets, pegs & bolts = $48

Total, not including tax = $480.89

Not bad! Having this custom made would have easily cost twice that (at least).

Other notable expenses that make this desk/shelf work:

9" Metal L bookends (these hold all that flat work vertical) = $11.90

Special Switch that Hooks 2 Computers to 1 Display = $31.96


If you think you wanna build this for yourself, holla at me and I'll send you the PDF plans. Shout out to KCool for helping me out during the cutting and assembling process.

I wonder what I'm gonna build next...

3.17.2016

The End of Phillie Mansion {Mega Photo Post}

It's been quite a lengthy process to completely move from one domicile into another. My circumstances abruptly moved me from one house to another with nary a chance to really go through everything, pack up or discard.
But the last six months I've been able to finally "move out."
I've been excavating my old place, tossing papers and relics I've long forgot about, sorting all the archived work, and organizing wayward supplies. I've been finishing up this move-out project this week. My last place truly housed some seriously creative years during the last decade of my life. Imagine a grown up clubhouse where we could create nearly anything you wanted to, where like-minded friends would fall through at any given time to discuss ideas and get some hands dirty drawing or recording. Countless paintings, drawing sessions, comics, audio, and videos were shot here during this period, much of which you may be familiar with (ahem, where do you think I made all this shit?). And while the work is the work I'm also very interested in the environment where the work is created. I've always been interested in what people keep and how they decorate their creative spaces. In return I will make this post a running thread archiving images from that era, posting images as I find them.
The name Phillie Mansion was a spoof name to a local Houston rap label SwishaHouse, known for putting out their signature Screw tapes and boosting the careers of many prominent Houston rappers. What became my last house/studio was an empty house next door my parents bought and rented to me. At first I just took my sound system and equipment there to make tapes, hence the name took hold and the Phillie Mansion was born.

Behold, The Phillie Mansion!


Computer room, Northeast Corner of the second floor

The South wall collage. Snips and compilations of my favorite images over the years. It's a big photo so click and zooom in if ya like.


The West wall collage. Below I had my turntables, above is a couple of CD shelves.


Downstairs, the band would play. Drums, bass and guitar amps, plus a PA with mics so vocals could be heard, music stand to hold lyric sheets. Most nights we would be working upstairs, we'd take a break and go downstairs to wail and play a few songs, then head back upstairs. The room was surrounded by other rooms so disturbing neighbors was hardly an issue.


But back upstairs we had more light and A/C


Afternoon sun in the kitchen

 There was never any shortage of friends and collaborators.


Crowded House.


I scoured my archive looking for other shots of friends who'd always fall thru but I couldn't find any more. You folks know who I'm talking about, I didn't forget about you, there's just no archival footage. 

 So there saga of the Phillie Mansion is divided into two distinct eras separated by a pivotal storm in Houston's history, 2008's hurricane Ike. When you see the walls of the living room as stark white that's Pre-Ike. When they're green it's Post-Ike.

In the Pre-Ike era I was still in college. It's also when my kitten Luna came to live with me. Here's are some Pre-Ike images.

The brown chair

Random Devin the Dude lyric: "I wanna quit smoking this shit but no luck."

Typical Work night.

Me with a tiny Luna, her early days.

Coolin' out in the kitchen. I loved that window, it always caught the nicest breezes.
View from my seat at that kitchen window.

#frozenchickentenderdick

Selfie before selfies were thing. I loved that shirt, it disappeared under strange circumstances.

Downing Grey Goose on a weeknight.


Stanley British invasion.


Substances.

Work Night.

More substances.


One of my first screen printed stickers, art made with filler fluid.


And then I would fill in a tooth with a gold paint marker.


My first multi-color screen print. Edition of 25, were Christmas gifts that year.

The struggle was real. The winter of 2008-09 was sooo cold and the Mansion had no central heating. This was how it was waiting for the oven to heat up the kitchen.


A Christmas in the Old Mansion.


Late Summer 2008, changes came, relationships ended, and Hurricane Ike hit forever changing the Houston landscape itself as countless trees can tumbling down, including a tall pine in my parent's front yard. I remember taking this pic in the kitchen afterwards, there's no power in the house. Gas was still on so family came over every so often to cook food and boil water.


As everything changed around me I only saw it fitting I change my surroundings as well. That winter I put some fresh paint up in the living room, light green walls and a dark green ceiling with an area rug to match. Out came the carpet revealing some decent hardwood floors underneath. I also splashed the stairway hall with a bright orange just to shake things up.

Hello Post-Ike Mansion.


The Mansion couch I had for quite some time. I bought it from a man who had it out in his yard after I saw it riding my bike one day. His place was in that neighborhood between Forest Park cemetery and Mason Park. Coincidentally he also graduated from HSPVA, albeit a much earlier class. I bought the couch for $20 and it was still in decent condition.

Here it is in it's last days. After countless hours drawing comics while binge-watching our favorite shows as well as tons of other shenanigans it's finally had it. But moving it out we were able to make one last video with it.


Living room art deco.
Even more substances.

A post-production shot taken after we wrapped the filming of Hi-Talk TV chapter 2. Watch it below!

Discovered more photos from the production!


KCool and some computer teardowns.


From that one time I puppy-sat a baby pug.


Rations.

A collection of wasps I would catch flying around in my house.


CATS! 
And now the official mascot and resident pet of the Phillie Mansion, Luna!
Luna came to me in 2006 as a street kitten found by my mother ans sister. I kept her in the bathroom with her litter box that first week until I kitten-proofed the Mansion. 


Since then everybody that has come thru has shown her love and she's shown it back. She loves creative energy and hates Sonic Youth (she'd hide under the bed when I blasted it). She's my lil' studio pal, and she'll hang around whatever room I happen to be working in, keeping me company.

KCool got this image of me and Loon passed out on the couch.
Lots more to come, this post ain't finished yet. I'll let you know when it is!